💻 Programming
There are two main programming methods supported and tested with the Smart Garden:
ESPHome
Tasmota
Arduino
In any case, and if you are using the USB port or the Serial port for programming it, you will first need to enter the board into flashing mode: press and hold the Flash pushbutton while you reset the board (pressing once the Reset pushbutton).
Caution
When flashing the board, make sure its only powered by the USB/Serial port.
ESPHome
ESPHome is a well known platform for programming ESP-based devices with a very little effort. It is configured via YAML files and supports a wide range of functionalities and sensors.
Important
For using ESPHome, and all its funcionalities, you need to have a Home Assistant instance running in the same network as your Smart Garden.
The Smart Garden comes raw, without any firmware by default, therefore, you will need to flash it for first time. There are many ways to flash your ESPHome device (locally, ESPHome Web), but the one I strongly recommend is the one through the ESPHome Add-on for Home Assistant:
Make sure your ESPHome Add-on for HA is up to date and working.
Add a new device, enter the name you want (like Smart-Garden), and skip the next step.
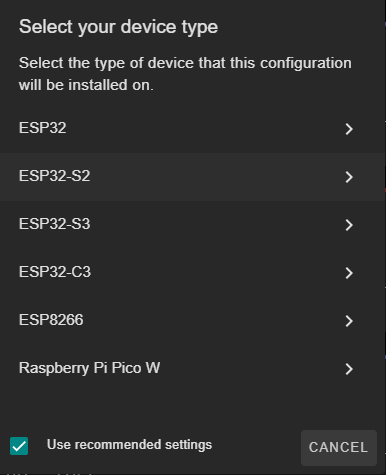
Select the ESP32-S2 as the device type, skip the last step (installation). You will have created a provisional first configuration YAML file.
Open the recently created file and replace the content with the example configuration.
Note
You might need to keep the encription keys OTA and API
 1substitutions:
 2  device_name: "smart-garden"
 3  friendly_name: "Smart Garden"
 4  project_name: "smart.garden"
 5  project_version: "2.0"
 6  ap_pwd: "smartgarden"
 7
 8esphome:
 9  name: "${device_name}"
10  name_add_mac_suffix: true
11  project:
12    name: "${project_name}"
13    version: "${project_version}"
14
15esp32:
16  board: esp32-s2-saola-1
17  framework:
18    type: arduino
19
20# Enable logging
21logger:
22
23# Enable Home Assistant API
24api:
25
26# Enable Over The Air updates
27ota:
28
29#Public location of this yaml file
30dashboard_import:
31  package_import_url: github://JGAguado/Smart_Garden/docs/source/files/configuration.yaml@V2R1
32  import_full_config: false
33
34# Enable fallback hotspot (captive portal) in case wifi connection fails
35captive_portal:
36
37improv_serial:
38
39wifi:
40  ap:
41    password: "${ap_pwd}"
42
43
44sprinkler:
45  - id: sprinkler_ctrlr
46    main_switch: "Lawn Sprinklers"
47    auto_advance_switch: "Lawn Sprinklers Auto Advance"
48    reverse_switch: "Lawn Sprinklers Reverse"
49    multiplier_number: "Lawn Sprinkler Multiplier"
50    repeat_number: "Lawn Sprinkler Repeat"
51    valve_overlap: 0s
52    valves:
53      - valve_switch: "Zone 1"
54        enable_switch: "Enable Zone 1"
55        run_duration_number: "Zone 1 Duration"
56        valve_switch_id: relay_1
57      - valve_switch: "Zone 2"
58        enable_switch: "Enable Zone 2"
59        run_duration_number: "Zone 2 Duration"
60        valve_switch_id: relay_2
61      - valve_switch: "Zone 3"
62        enable_switch: "Enable Zone 3"
63        run_duration_number: "Zone 3 Duration"
64        valve_switch_id: relay_3
65      - valve_switch: "Zone 4"
66        enable_switch: "Enable Zone 4"
67        run_duration_number: "Zone 4 Duration"
68        valve_switch_id: relay_4
69
70switch:
71  - platform: gpio
72    pin: 10
73    id: relay_1
74    icon: "mdi:sprinkler-variant"
75
76  - platform: gpio
77    pin: 11
78    id: relay_2
79    name: "Zone 2"
80    icon: "mdi:sprinkler-variant"
81
82  - platform: gpio
83    pin: 12
84    id: relay_3
85    icon: "mdi:sprinkler-variant"
86
87  - platform: gpio
88    pin: 13
89    id: relay_4
90    icon: "mdi:sprinkler-variant"
Click on install, make sure that the the board is connected via the USB-C (and that it is into flashing mode, see up in this guide) to the device running the Home Assistant (in my case a Raspberry Pi) before selecting the mode of installation.

Select the Serial port and let it run, it might take some minutes.
Once it’s done, you will have to exit the flashing mode: press the Reset pushbutton once.
Now, your ESPHome-based Smart Garden should be ready to log data and stream it to your Home Assistant. Note that the current configuration is just an example and you can customize it at your will, including the calibration.
Flash Tools
If you want to deploy an ESPHome already compiled .bin image, you can use Espressif’s official Flash Download Tools to upload it into your Smart Garden. If you downloaded the .bin from ESPHome or you compiled any compatible image, you can upload it through this tool. Just make sure the address is set to 0x0 and the DoNotChgBin option is checked:

Tasmota
As an alternative easy-to-use and still powerfull, you can flash Tasmota into the Smart Garden directly. This option is higly recommendable if you want to want to have an Alexa compatible device (based on a Hue emulated bridge) without the need of a full Home Assistant setup.
The easiest process of flashing Tasmota into your Smart Garden goes as follows:
Plug the Smart Garden into your computer’s USB.
Go to the Tasmota Web Installer
Follow the process selecting ESP32-S2 as device and select the correct port (remember to enter the board into flashing mode).
After the process is completed, press the reset button.
Once rebooted, the Smart Garden will create a wifi hotspot containing the name Tasmota. Connect and enter your WLAN setup on the captive portal.
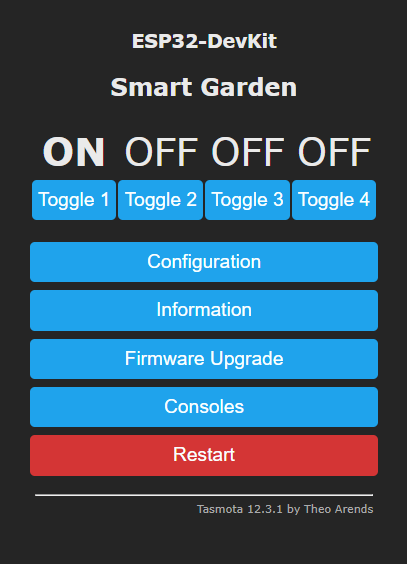
Get the IP assigned to the board (check your router’s connected devices) and enter it into your browser for accessing to the Tasmota’s WebUI.
Now you can customize your board as you want. Let’s first assign the output class ‘Relay’ to the corresponding outputs 10, 11, 12 and 13.
In addition, some of these other commands can be entered through the Console (Consoles -> Console):
Timed output: With the command
PulseTime3 300you can make that the relay 3 turns off after 5 minutes (300s). This option is highly indicated as a safety feature to prevent your home to get floaded.Interlocks: With the command
interlock onyou can make that ONLY one of the 4 relays can become active at the same time. For selecting the group of the for relays just use the commandinterlock 1,2,3,4. This mode can become usefull when your home’s water pressure is not high enough for holding more than one watering zone at the same time.
In any case, you can find these and much more commands to customize your Tamota’s flashed Smart Garden on the official Tasmota documentation
And, by the way…
If you want Alexa to directly recognize your Smart Garden to directly controle each output through voice controls, go to COnfiguration -> Configure Other and select the option ‘Hue Bridge multi device’ emulation.
Arduino
If you are still interested in programming directly with the Arduino IDE, the procedure is no different than with any other ESP32 devices:
Open the Arduino IDE and go to File -> Preferences option.
Add to the Additional Boards Manager URSLs the url:
https://dl.espressif.com/dl/package_esp32_index.json
Close the preferences and open in the menu Tools -> Board -> Boards Manager.
Search for esp32 and install it. This might take some time.
Now you can select the board ESP32S2 Dev Module as the target board. Leave the rest of parameters by default.
Select the correct port and remember to enter the board into flashing mode before uploading the sketch.